Sometimes at rehearsal with my band, we’ll play with a click to focus on rhythm. We use an old BOSS DR-770 drum machine set to a simple accented rimshot pattern. This certainly works better than running a metronome app on the phone. All good, until the DR-770 battery dies…More
I often refer to (and recommend) Helmuth Lemme’s article The Secrets of Electric Guitar Pickups. The author succinctly describes the guitar circuit and discusses how each component of the circuit contributes to the resulting guitar tone. More
Our Mackie DL1608 Mixer has a frustrating flaw. And I have an inexpensive low-tech solution that works.
See that row of 16 gain knobs along the DL1608 back panel? They are super-low torque and easy to turn, which means that every time we transport the mixer between gigs and rehearsals, something gets bumped. More
In this article, Pete Biltoft at Vintage Vibe Guitars goes in-depth on the simple, often overlooked output jack.
Thanks again to Pete for the permission to post this here!
September 2013
Howdy!
The topic for this tech tips newsletter is the all-important output jack.
While there are a few different styles of output jacks have been used in electric guitars and basses including cables with XLR connectors, ¼” stereo output jacks and 1/8” size mono and stereo jacks, for the purposes of this newsletter I plan to focus on the industry-standard ¼” mono output jack. I quite often use output jacks manufactured by Switchcraft and unless specified otherwise in this discussion I will be referring to the Switchcraft model output jack designed for strat, tele and Les Paul style instruments.
This simple and often overlooked component provides both a mechanical and an electrical interface to the guitar cable and is one of the most frequent causes of electrical issues in an electric guitar or bass.
My pedal board is flush with overdrives, but sorely lacking in distortion. I’ve never loved my RAT – it has scurried on and off my pedalboard over the years, never finding a permanent home there. I’ve really been needing a solid traditional distortion lately, to use with my band covering tunes by Green Day, Blink-182, Weezer, etc.
I love my Vox Ice-9 overdrive, so I decided to try out the Vox Satchurator. It’s apparently a boutiquey version of the classic Boss DS-1. When I received it, I immediately plugged in and lost myself in its glorious tones for an hour or so. It sounds really really good. Very different from my overdrives and fuzz. It has a big, saturated, overtone-rich distortion. Excellent for thick heavy leads, but also equally good for massive chunky rhythm.More
In this article, Pete Biltoft at Vintage Vibe Guitars describes the various causes of guitar feedback, both good and bad, and provides some suggestions for eliminating unwanted feedback.
Thanks again to Pete for the permission to post this here!
June 2013
Howdy!
Feedback: when it is used in an appropriate, controlled manner it can be glorious; when it appears unwanted it is about the worst sound ever. In this Tech Tips newsletter both types of feedback will be discussed.
Let’s start with the undesirable out of control high pitched screech we want to eliminate, and then move on the good stuff.
Unwanted microphonic feedback in guitars with magnetic guitar pickups usually arises from one or more of the following sources listed below. With each of these sources I have added suggestions in italics for eliminating the associated feedback.
Vibration of the coil windings inside a magnetic pickup. Most modern pickups are potted in molten wax under vacuum to reduce the possibility of unwanted microphonic feedback.
There are also a number of products that instead connect using the dock connector on the bottom of the iDevice, for example the Apogee Jam, Sonoma GuitarJack, Alesis iO Dock and Line 6 Mobile In. These interfaces have their own A/D converters, and pass the signal digitally to the iDevice providing higher quality audio. The downside is that you can’t charge the iDevice on battery while using the interface, which may be an issue for live performance and recording.
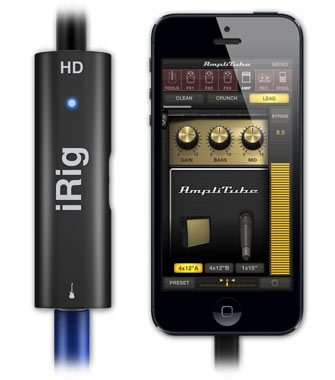
There’s a new contender in the dock-connected interfaces, and it looks pretty nice: the IK Multimedia iRig HD. In appearance, it looks very similar to the Apogee Jam. I prefer this style of interface, rather than the Sonoma, and Line 6 approach which have the entire unit hanging off the dock – that seems very precarious and likely to break the dock.
Also, at $99 the iRig HD is cheaper than the $129 Apogee Jam. If you have a newer iDevice with the lighting connector, the iRig HD is an even better deal, as it includes the lightning adapter cables as well as the older-style 30-pin connecter, and also a USB connector for use with a computer.
All that said, I’m perfectly happy with my DIY interface for practice, but if I was using it for recording or live performance, I might consider buying this iRig HD.
In pedal building, we almost exclusively see the Hammond-style diecast aluminum enclosures. You know their names- the ubiquitous 1590B (aka 1290NS) and its plus-size cousin the 125B. Then there’s the larger 1590BB, and the tiny and temperamental 1590A. What these all have in common is the simple generic rectangular shape.
But what if you’re a fan of the spring-loaded foot-pedal enclosures made famous by the BOSS and Ibanez pedals?
Typically, the only way for DIY pedal builders to achieve that look was to buy an old pedal and gut it- but then you’re stuck with the original pedal’s drilling layout.
Now there’s a new option- I just came across these new enclosures from Rixen Pedals.
As I mentioned previously, my pedal board’s power supply died, so I’ve been temporarily using an old Korg 9V power supply.
I’ve been getting some hum from Ryan’s Fulltone Fat-Boost, and finally decided to do some sleuthing to figure out why.
Fortunately, before I even cracked open the Fat-Boost, I hooked up a multimeter to measure the voltage output of the Korg supply, and it turns out that this little guy is really putting out 13V, not 9V. Well, that’s annoying. Is it mislabeled, or just over-compensating for something?More
You wouldn’t believe how often I get asked this, in the comment-responses to my electronics videos. (I’ve just added this to my FAQ)
In the US, solder is pronounced “saw-der” (ˈsɑːdər) without the L. My family is Australian- I grew up doing electronics projects with my Dad, pronouncing it with the L as “sole-der” (ˈsɒldər). I have to really make an effort to say it the American way.More


 Also, at $99 the


